Welcome to Our New Website!   Shop now

Cart

Product categories

Techniques to use on chipboard

by | Aug 23, 2021 | Inspiration

Good morning

A week or so ago on the Facebook Chat page Jane asked
“Re: chipboard
Do some of you paint it/ colour it in some way and if so how?”
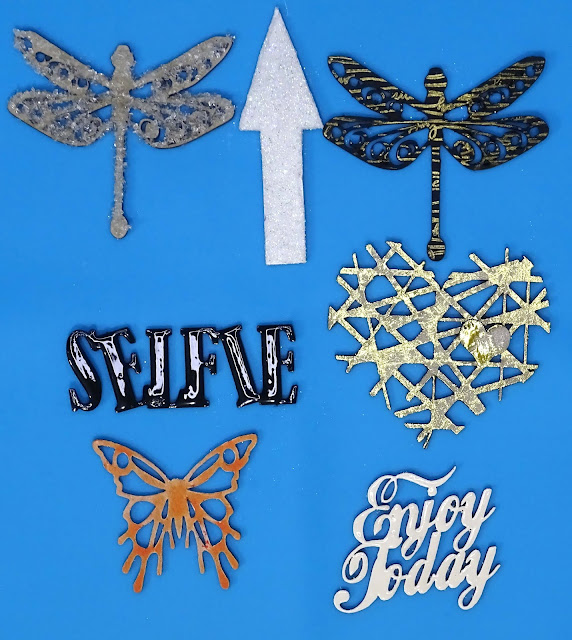
so today I want to share with you six ways I change
 the appearance of my chipboard to suit my layouts or cards.

Let’s start with this one

The dragonfly chipboard I have used is from Memory Maze – Linda’s Scribble and Butterflies
I have coated the dragonfly with glue and then sprinkled Dress My Crafts Frosted Sugar Powder all over it.
The arrow is from Memory Maze – Follow Your Dreams set. I coated it with white acrylic paint and then glue before covering it with white iridescent glitter.
The white paint certainly makes a difference to the finished look.
You could, of course, use any coloured paint under the Frosted Sugar Powder or glitter for a completely different look.
No. 2
Once again I have used a dragonfly from the Memory Maze – Linda’s Scribble and Butterflies set.
This time I have given the chipboard a coat of black acrylic paint.
Once it was dry I used Uniquely Creatives Wavy Words stamp and Gold Ink
to stamp on top of the black paint.
If you liked you could add a coat of Glossy Accents or similar to give a high gloss finish to this technique.
No. 3
This chipboard is from Dusty Attics Mini Captions #2 set
I applied a solid cover of black acrylic paint and then a coat of Glossy Accents.
I love this technique for words and titles, it gives a high gloss domed look and
looks fantastic on top of metallic paints too.

No. 4

The chipboard for this technique comes from Memory Maze – Card Sentiments 2
I used my Versamark Ink pad and white embossing powder to colour this piece. I actually gave it two coats of embossing powder so I got that nice smooth finish to the piece.
Once again this could be done in any colour.
Very fast and simple to do.
No 5
This chipboard comes from Memory Maze – Criss Cross Hearts
I applied a coat of Deco Foil Transfer Gel Duo, let that dry and then laid a sheet of
Fab Foil in Gold on top of it and rolled over it with my brayer.
The foil did not stick to the whole surface but it has a very grunge modern look to it.
No. 6
The chipboard for this technique is from Memory Maze Wire Butterfly set.
I painted the butterfly with white acrylic paint and when it was dry I sprayed it with Glimmermist’s Pumpkin Spice spray.
It has a beautiful shimmer in real life
You could also add a layer of stamping between these two layers for added interest.
So there we have 6 way you could personalise your chipboard to suit your project.
There are, of course, many many more.
I would love to hear or see your favourite ways of changing the look of your chipboard.
My process video is below.
Till next time
Stay safe
Hugs
Julie

News

Related post

2 Comments

  1. Karen Haywood

    embossing powers are great fun as well and I have some opal powders
    used to be made in Tas they are perfect for using on chipboard,
    I love using paint and shimmers etc from the store here

    Reply
    • Julie

      There are so many different things you can do with chipboard isn’t there Karen. I love learning new ones

      Reply

Submit a Comment

Your email address will not be published. Required fields are marked *

Shipping

Standard shipping $12.95

Secure Payment

We offer safe shopping guarantee

Online Support

We provide phone & email support

0
    0
    Your Cart
    Your cart is emptyReturn to Shop